There is a lot to cover after every round in the NRL. Throughout the 2024 season, this is a place where I’ll cover what is most important, a few little things I liked from the round, something to keep an eye on in the next one, and a try I particularly enjoyed.
If you like what you see here and want everything we put together at Rugby League Writers delivered straight to your inbox, you can support our independent NRL analysis with a Premium Membership for only $5 a month.
What you’ll get in this NRL Round 17 Review:
- Parramatta’s scrum tactics on full display
- Schneider’s smart play
- More Katoa
- Field goal sets
- Taumalolo’s subtle involvement for points
The Tough Carry: Parramatta’s scrum tactics on full display
Tackle 1 is often the toughest carry of the set. It can make or break it. Here, it’s my biggest talking point from the round that was.
The Parramatta Eels fell short on Saturday evening and their 2024 NRL season appears to be over as far as finals are concerned. Still, I particularly enjoyed the tactical battle at scrum time against the Newcastle Knights defence.
I feel like a broken record harping on about scrums while they barely rate a mention elsewhere, but they’re a gift for attacking teams and one of the clearest and easiest-to-consume tactical battles on the field.
Parramatta scored the same try in two different ways depending on the look the Knights gave them in Round 17. Both aimed to exploit the speed advantage they had outside Dane Gagai on the right edge.
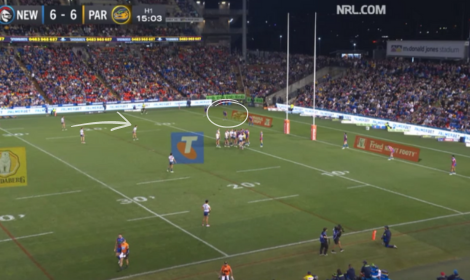
You can see here that the Knights have adopted a 3/3 split despite the Eels setting their 4/2 early. It’s not uncommon, but requires the right edge to push up off the line hard and fast while the backrower in the scrum breaks quickly to cover the space inside.

It doesn’t happen quickly enough for the Knights.
Dylan Brown receives a great pass off the ground from the back of the scrum and is able to engage Will Pryce enough to sit Gagai outside him. Gagai is a great defensive centre, but at 33 years old, can’t match Mitchell Moses for speed.

Presented with a scrum from the same spot later in the match, the Eels shape up in the same way with Moses and Brown making a 4/2 split down the left edge.
You can see Matthew Arthur pop his head up seeking clarification from Clint Gutherson on which way his pass should go from the back.

With the Knights matching them this time, the Eels take the two and ask Will Penesini to do his best with the extra space.
It’s Moses’ second try that I really like.
Having seen the Knights adjust from the middle, they’ve taken the scrum from the right scrum line this time and stacked six players on the open side. Meanwhile, the Knights kept their winger down the shortside to give the Eels an extra number.

Parramatta ran the same shape further up the field earlier but dropped a forward off into the middle of the field. Closer to the line, though, they pulled the trigger.
It follows the same approach as Moses’ first try: Brown makes a line for Pryce with a lead on Gagai’s inside shoulder as Moses sweeps around the back.
While the Knights break hard from the scrum, the Eels beat the scramble with a quick pass from Blaize Talagi to Brown.
Brown shapes to drop the forward off to hold up the middle and sit Pryce, but instead holds the ball and releases his pass to Moses in the exact same channel he did so for the first try.

Once again, Moses is one of the fastest halfbacks in the NRL and beats a scrambling Gagai for pace.
Not to be mistaken for a hit-piece on Gagai, Parramatta’s scrum tactics are an excellent example of how teams can create the looks they want. They designed a plan to capitalise on Moses’ speed and executed it twice to perfection.
Should teams mirror in defence? Is the scramble from the inside enough? The side in which the scrum is fed also plays a big part in these actions and others (think: Roosters try last week or Christian Tuipulotu’s on Sunday). There is a lot to consider on both sides of the ball.
In the NRL, games are often decided by moments. Scrums are the perfect platform for creating them, and we’re seeing teams become more creative every week.
Quick play-the-ball: Two young halves showing their smarts
We’re generating momentum through the middle of the article with a couple of quick carries.
Schneider’s smart play
It wasn’t a great day for the Penrith Panthers as they struggled to generate many dangerous looks in attack. However, Brad Schneider displayed some promising smarts when faced with the opportunity to take the line on late in the first half.
The Cowboys have been reduced to 12 men which means Scott Drinkwater needs to spend more time in the defensive line that he would like. We’d often see fullbacks fill a similar position to what Drinkwater is here, but not move up so far off the line once the ball is past him.
But with only five players outside him, Drinkwater needed to get up to create the genuine 6/4 split he wants from that point of the field.

Schneider spots him and know he’s going to get a good look. Perhaps not that good, as Drinkwater failed to make the tackle. But a strong carry between two sliding defenders to generate ruck speed at the very least.
In the end, he’s the beneficiary of a poor attempted tackle. It’s a smart play from the young half, though.
More Katoa
If Twitter hadn’t died, we’d have seen a KatoaSzn account by now. Perhaps I’d have even ironically made it, such is my growing obsession with the young halfback.
He’s just that good and still going to get much, much better.
The 20-year-old kicked a superb 30/20 with the wind at his back on Sunday afternoon. He’s told those outside him that the kick is coming and executed to perfection. They wouldn’t be so flat with him otherwise.

While it’s only one 40/20, the fact he has one of these moments every week is what makes him so good for his age.
Setting up for a shot: Field goal sets
Teams play to points with the following tackle in mind. Here, I’m touching on something to watch next week as we try to keep ahead of things happening on the field.
Having re-watched the two field goal attempts in Golden Point on Thursday night, I don’t think the commentary around the Sharks and Nicho Hynes is entirely justified.
Ideally, you don’t want to set up too close to the opposition try line for a field goal. For every metre you creep inside the 10, the defence has one metre less to travel to apply pressure. Still, it looks as though the Sharks tried to set up further out before Siosifa Talakai broke through a poor Reed Mahoney tackle and pushed his way through to five metres from the line. He’s who you want to take the carry leading to an attempt.
Another positive: the blocker disguised as a lead runner. Cameron McInnes was never getting the ball, but still made sure Mahoney had to run around him to pressure Hynes.
Hynes should have knocked it over from there. He got a decent enough look. The Sharks still had a tackle up their sleeve to search for a better setup, too.
It’s a bad miss more than anything else…
In contrast, the Bulldogs used an offload around halfway to get into position for a shot. The controlled offload is a regular component of field goal sets starting deep in yardage. Able to generate momentum through two carries on the back of it, Matt Burton had time and space to kick the winner. However, it’s worth noting the pressure is not too dissimilar to what Hynes fielded earlier if not more difficult to clear.
Burton didn’t have the benefit of blockers disguised as lead runners. This is a little bit out of the box, but perhaps that might be an advantage of kicking closer to the line? Attacking players are more likely to fall into shape around the ruck attacking the line, and can be placed there as blockers without the scrutiny they would further up the field. Without them further out, Blayke Brailey had a free passage to Burton from marker.
Hopefully, we will see a few tight games and field goal sets in Round 18 to examine it all again.
Try Time: Taumalolo’s subtle involvement for points
Sometimes, it’s a piece of magic. Other times, it’s a basic move made to look easy. Whatever it is, all great sets end in points, so we’re doing the same here.
The Panthers played with a makeshift edge, but the Cowboys did an excellent job of exploiting it in the right way on Sunday afternoon.
A major reason for Penrith’s sustained success is that its systems flow through the whole club. Depending on the players available, there will be minor differences between the NRL and NSW Cup, but the fundamental skills and approach are the same.
Their key to edge defence is getting high and staying square and relatively tight. If you’re to beat them, it has to be on the outside.
That’s exactly what the Cowboys did thanks to a quick Jason Taumalolo involvement.
He might not be the barnstorming middle he once was, but Taumalolo moves the ball a lot better now than he did when he started his NRL career. His pass creates space out wide on this occasion.
By holding up the middle and using a lead runner on Scott Sorensen’s inside shoulder four-in, Taumalolo is able to sit Jack Cole (three-in) for just a second. That’s enough time for Drinkwater to sweep around the lead and beat Sorensen’s charge from the inside before throwing the floater.

It’s a difficult pass. It’s the pass Penrith is willing for the attack to throw if they’re good enough. With Penrith not quite as high off the line as they’d like and with Drinkwater capable and willing to throw the floating pass more than most, North Queensland managed to break down the best defence in the NRL over the last four years to score a beauty.