There is a lot to cover after every round in the NRL. Throughout the 2024 season, this is a place where I’ll cover what is most important, a few little things I liked from the round, something to keep an eye on in the next one, and a try I particularly enjoyed.
If you like what you see here and want everything we put together at Rugby League Writers delivered straight to your inbox, you can support our independent NRL analysis with a Premium Membership for only $5 a month.
What you’ll get in this NRL Round 15 Review:
- Breaking down two individual efforts
- Hamiso Tabuai-Fidow’s Try of the Season
- Dylan Brown’s shortside
- Liddle’s simple try
- State of Origin 2
- Isaiya Katoa’s deception
- Cowboys switch play
The Tough Carry: Breaking down two individual efforts
Tackle 1 is often the toughest carry of the set. It can make or break it. Here, it’s my biggest talking point from the round that was.
I debuted Anatomy of a Try last week and looked into the finer details of a Melbourne Storm shortside try. With two incredible individual efforts in Round 15, I couldn’t decide on one to cover, so will instead quickly touch on both.
Hamiso Tabuai-Fidow’s try against the Cronulla-Sutherland Sharks on Thursday night is the new leader for Try of the Season. The evasiveness, speed and balance left jaws on the floor. Dylan Brown played the Parramatta Eels back into the game against the Sydney Roosters with his footwork down the short side.
But these individual efforts don’t just happen. Tabuai-Fidow’s came on the back of the smallest opporunities while Brown generated his own and made the most of it.
In Tabuai-Fidow’s case, he took advantage of the slightest error in the Sharks kick chase.
You can’t fault the effort of Braydon Trindall here. He leads the kick chase and is at least in the corner of Tabuai-Fidow’s eye when he makes the catch.
However, if you’re going to add that extra speed to the kick chase to get out in front of the line, it’s crucial that you land on him.

You can see the triangle Trindall’s chase creates.
Two middles (circled) haven’t made it up with the line which forces Trindal further to the right edge than he’d liked to be. Siosifa Talakai on the left edge, however, doesn’t close that space.

The subtlety of Isaiya Katoa’s effort shouldn’t be ignored either. He worked hard to get back and played a part in Trindall pulling up on the kick chase. That half-second Trindall slowed down is all Tabuai-Fidow needed to beat him.
The half-gap created by Talakai staying wide is all he needed to break through into the backfield, and the result is a Tabuai-Fidow special, and a Dolphins win.

It’s a superb effort—one we will see time and time again over the years. But it’s also a great example of how the tiniest of efforts—Katoa’s movements, Trindall’s speed on the kick chase, middles failing to fill the space, and Talakai staying wide—can have a big impact on a single play.
Brown only needed a small cue to score a beauty of his own on Saturday night.
Shifting the ball on 4th tackle, Brown isolated Kelma Tulagi onto Sam Walker. It’s a good look for the Parramatta Eels who, at worst, would earn a good platform to kick from on the last.
But as Walker falls off the tackle and forces Joey Manu and Victor Radley to get involved, Brown swings into action.

Neither Manu nor Radley are effective in the tackle and fail to get to the marker, which leaves Fetalaiga Pauga on an island down the short side. Whether or not Walker is better to get straight back or outside Pauga is up for debate.
Brown spots Walker trailing and flips. With both markers tied up in the previous tackle and Pauga caught in two minds, Brown’s in-and-away is a thing of beauty.
Walker is caught in a tough spot himself, holding on Brown with Sean Russell also outside him, and doesn’t end up in any position to make an effective tackle.
It’s the perfect shortside look, and Brown nailed it.
Quick play-the-ball: Liddle’s simple try, State of Origin Game 2
We’re generating momentum through the middle of the article with a couple of quick carries.
Liddle’s try isn’t an accident
Jacob Liddle scored a simple try on Sunday afternoon, but it didn’t come by accident.
The poorly thoughtout new dropout rule was sprung late and teams are still tinkering with ways to attack and defend it. Defensively, Liddle’s movements have become common.
He starts in the middle of the field but makes a line in behind the Sea Eagles contest once the ball has been kicked.

It’s a numbers game from there. The Sea Eagles bat the ball back and have more jersey’s around the ball, but it falls for Liddle who crashes over for an easy one.
State of Origin Game 2
Both the Queensland Maroons and New South Wales Blues have made changes to their squad for Game 2 of the series.
Somehow, David Fifita still can’t get a look in for Billy Slater. He missed Round 15 of the NRL season, so perhaps that is the reason this time around, but as the best backrower available, it’s still a surprise to see him miss out again.
Selwyn Cobbo being rested is another head-scratcher. His inclusion in the side had a massive impact on the victory in Game 1. The Maroons will instead play without an outside back on the bench at all.
Despite the Blues being the team playing with 12 men, I think we learned more about them than we did the Maroons. Queensland lost Reece Walsh, who is arguably the most important player in their attack. Everything plays differently when the opposition is down a man, too.
The Blues, on the other hand, gave us a fairly clear picture of what they intend to do with the ball and have named a stronger team to do it in Game 2. Keep an eye on NRL.com tomorrow for more on that picture.
Plenty will overstate Latrell Mitchell’s record for the Blues, but it can’t be ignored either. Some players are ‘big game players’ and we’ve seen enough of Mitchell to suggest he falls into this group. His inclusion isn’t a concern. Nor is Mitchell Moses who perhaps should have been there for the series opener despite coming off an injury.
How Dylan Edwards involves himself in the attack is a key consideration. James Tedesco was passed into an underlap on the edge more often than not in Game 1 and understandably struggled to have an impact. Given Edwards isn’t renowned for his ball playing, how he spots up on the edges will be interesting to keep an eye on early.
The inclusion of Connor Watson is… interesting. Matt Burton seemed locked into the utility position if Michael Maguire wanted one, but he surprised everybody by opting for Watson. His comeback in recent years has been impressive. Still, I think Burton would have been the better option for this one.
It’s early days, but I like the look of the Blues levelling the series next week.
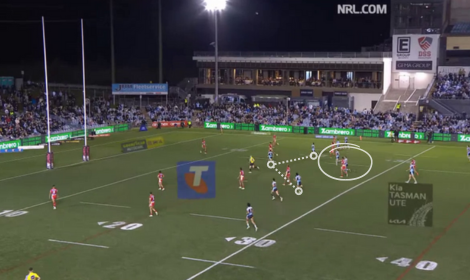
Setting up for a shot: Isaiya Katoa’s deception
Teams play to points with the following tackle in mind. Here, I’m touching on something to watch next week as we try to keep ahead of things happening on the field.
Isaiya Katoa is ridiculous.
He shouldn’t be this good so young.

Kodi Nikorima is credited with the try assist, but it’s Katoa who creates the chaos in the defensive line that allows Jack Bostock to crash over. His deception to drop Euan Aitken off underneath while digging deep into the line holds up the sliding defence. Holding the ball out as though he’s playing short, Katoa delays his pass until the very last moment and manages to find Nikorima out the back
While he doesn’t produce the highlight reel moments or even the numbers of other young players, he’s comfortably the best prospect in the NRL right now. Keep an eye on who throws the pass before the pass for the Dolphins against the Melbourne Storm in Round 16.
Try Time: Cowboys switch play
Sometimes, it’s a piece of magic. Other times, it’s a basic move made to look easy. Whatever it is, all great sets end in points, so we’re doing the same here.
The North Queensland Cowboys spotted an opportunity in the Canberra Raiders defence and played to it to perfection in Round 15.
It’s 5th tackle here and I think Jordan Rapana will be using Scott Drinkwater as the indicator. Drinkwater is their most dangerous attacking player and the ball will find him late in a set more often than not.
It did in this one, but he quickly switched the play for Jeremiah Nanai to score.

You can see Rapana working to his right edge in anticipation of a Drinkwater grubber or run play. Naturally, the three players on the left edge cave in and start to follow the ball.

With the four man taking a couple of steps towards the ball, a gap opens up for Chad Townsend to kick through. As the three-man looks to close it, Nanai is presented with another big hole to run through untouched.

Rapana’s work rate is incredible, but his early work made it more difficult to get back across to cover the kick. It’s a nicely constructed play that worked out exactly as the Cowboys drew it up.