Clinical Warriors
The One NZ Warriors superb 2023 campaign continued in NRL Round 20 with a dismantling of the Cronulla Sharks left-edge defensive unit.
The points came thick and fast when they did, but not before the Warriors soaked up some early scoreboard pressure. As they’ve done all season, the Warriors embraced the grind, defended their line and played towards a specific gameplan in attack.
That gameplan was a simple one; lay towards the posts, split the defensive line down the middle and isolate Matt Moylan on the Sharks left edge.
It was a gameplan that ended up producing five or six expertly executed rugby league tries, in another vote of confidence for Andrew Webster’s maiden season as an NRL head coach.
The Warriors first try through Dallin Watene-Zelezniak was their best of the afternoon, and the best indication that this Warriors side knows exactly what they want to do with the ball in hand.
It starts with a play-the-ball on the left tram line.

Dylan Walker and Shaun Johnson link up to move the ball to Rocco Berry on the right edge, but the Sharks number up and slide effectively. They force Berry to step back infield and reset, inviting Blayke Brailey (9) and Cam McInnes (13) into the tackle.
Only the Warriors don’t reset.

Another sweeping action follows the first as Johnson, Walker and now Luke Metcalf swing the ball back to the left edge. Adam Pompey dies with the ball, but not before managing to drag another middle – Toby Rudolf (10) – into the tackle.
The Warriors have now gone coast-to-coast in two phases. Cronulla has tracked the ball across-field and contributed a middle to the tackle on both occasions.
When Walker then takes a hit-up right into the teeth of the Sharks defence, the middles are under pressure and fatigue on their own line:

Oregon Kaufusi hasn’t made a tackle in this set but he’s done some work moving across the field. He parks himself at A-defender on the short side but is pulled across to the open side at the last minute by Will Kennedy, who sees what’s coming.
Late into position and under fatigue, Kaufusi doesn’t make himself a genuine number in the line when Walker plays the ball and the Warriors search right:

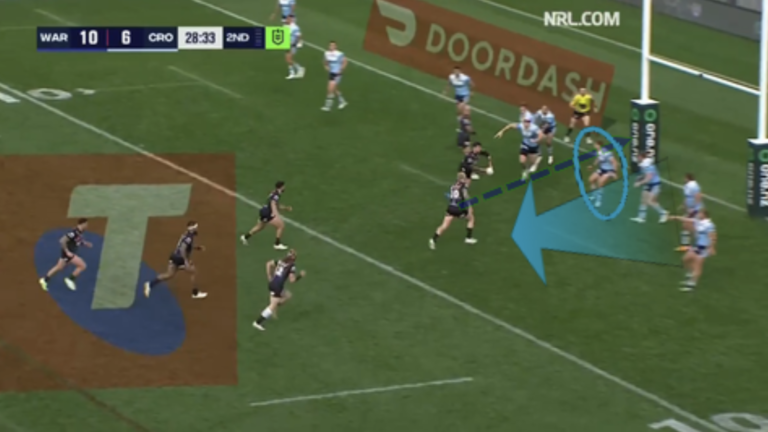
With Kaufusi late into position beside the ruck, Wayde Egan is afforded the space to jump out from dummy-half. He uses Tohu Harris’ lead run to turn the four-in defender – Wade Graham – and isolate Moylan one channel wider.
With Johnson getting on Graham’s outside, the overlap is created.
Mitch Barnett gets his line wrong but it doesn’t matter – Moylan has three players coming at him and can’t make a play on any of them. A clean pass from Charnze Nicoll-Klokstad finds Watene-Zelezniak on the paint from there and the Warriors are in.
They wasted no time in going back to the well, either.
An 80+ metre yardage gain from the kick-off was backed up by an aggressive defensive display as the Warriors locked in. They limited Cronulla to a total 60 running metres from two exit sets to quickly find themselves back on the attack.
Playing to a plan, Addin Fonua-Blake again laid the platform for the Warriors to fire a shot.

Take note of the defenders in this tackle; Brailey, McInnes and Williams. Three Cronulla middles are caught up at the ruck as the Sharks split their defensive line in half, with five players between the uprights and the corner posts on either edge.
The Warriors were only ever going one way here, though.

McInnes (13) peels late from the Fonua-Blake tackle and hurries back to A-defender on the Sharks left edge. Like Kaufusi in the lead up to Watene-Zelezniak’s try though, McInnes is late into position and doesn’t cut down Egan’s time on the ball.
And so when Egan plays direct from hooker with a lead runner off his hip, Cronulla’s left edge folds in. Graham can’t get at Johnson and he can’t help Moylan either, who again has two players coming at either shoulder.
A peach of a pass from Johnson to Berry does the rest.
Not done there, the Warriors completed their six minute blitz with a third try to Fonua-Blake shortly afterwards. It followed the same principles as the first two tries; engage the middle, compress the edges and isolate Moylan on his line:

A Barnett hit-up engages Tom Hazelton, McInnes and Williams – three middles – into the tackle on play one.
Egan sends Walker right back at them on play two, promoting fatigue around the ruck and helping Walker win a quick play-the-ball. Walker’s play-the-ball is so quick in fact, that Hazelton and Williams aren’t in position at marker when Egan scoots and goes:

With Hazelton unable to pressure his inside, Egan gets out from behind the ruck to target the diminutive Brailey at A-defender. The threat of a 104kg Barnett one-on-one with an 80kg Brailey forces the four- and five-in defenders – Graham and Williams – to turn in towards the ball.
As with the previous two tries, that movement isolates Moylan at three-man.
Moylan can see what’s coming and is actually pointing at the real threat; Johnson out the back with Josh Curran and Fonua-Blake in a tight block shape off his hip. He doesn’t get the help he needs though, as Johnson passes Fonua-Blake into the space between Moylan and Graham to score.
That is clinical attacking rugby league.
In every example, the Warriors got to certain spaces – or certain defenders – in the lead up, creating the opportunities later in the count.
In fact, in the six minutes between Watene-Zelezniak’s and Fonua-Blake’s tries, the Warriors did everything right.
Cronulla had just two possession in that time for a total yardage gain of 60 metres as the Warriors locked-in defensively. Berry scored next courtesy of the field position those defensive sets earned, and a 40/20 from Johnson put Fonua-Blake in range to score their third.
Andrew Webster has this Warriors side flying right now. They’re all on the same page and they know what their strengths are and how to play to them.
With a relatively friendly closing draw, the Warriors are perfectly positioned for a thoroughly-deserving Top Four finish and a home final in the first week of September.
Let’s Gone.
There’s Always Next Week For…
… The Dolphins
At halftime, The Dolphins were down 12-4 against one of the best front-runners in the NRL. Three early tries – one against the run of play – gave the Panthers an early lead and it looked like they’d grind their way to full-time from there.
By midway through the second half though, the Panthers had completed just 50% of their sets since the break to give The Dolphins a sniff… and they took it.
With Hamiso Tabuai-Fidow in the centres, The Dolphins went left in attack and went there often. Nikorima and The Hammer himself crossed for well-worked tries down that channel before Connelly Lemuelu produced a miraculous kick-and-regather effort to take the lead with 25 minutes remaining.
In their next attacking set though, Lemuelu again put boot to ball only this time his kick handed Penrith a seven-tackle set and all the momentum. The Panthers did what they do best from there; punishing The Dolphins errors to play with all the ball in the final quarter and come away with two tries.
It’s a disappointing result for The Dolphins but they impressed to go toe-to-toe with Penrith for as long as they did. A few poor decisions with the ball undid all their good work in the end but it’s a performance Wayne Bennett can build on.
That being said, I think Lemuelu might’ve had his kicking lisence rescinded in Monday’s review.
NRL Round 20 Shout-Outs
Sandon Smith & Jake Turpin
The Sydney Roosters season is all but over following a 30-16 loss to the Melbourne Storm in NRL Round 20. Rather than dive into where it’s all gone wrong for Easts in 2023, I’m singling out a few positives from a miserable year.
Sandon Smith and Jake Turpin had some promising involvements again on Saturday and deserve to be in the calculations for 2024 and beyond.

Turpin is a genuine dummy-half and can feature in this Roosters side, moving forward. He’s a smart playmaker with a sound running game who can trigger short-side raids effectively – one of the Roosters strengths in attack.
Smith in particular has struck up a likeable combination with Turpin over the last few weeks. They’ve linked up nicely in yardage and are demanding consideration for season 2024.
How they play out the next seven weeks could have a major bearing on the Roosters spine makeup next season.
The NAS Effect (Vol. 3)
I’ve spoken a lot about Nelson Asofa-Solomona on an edge this season.
Craig Bellamy is a genius and he’s found ways to utilise Big NAS’s size and gravity as a ball runner – even when he doesn’t touch the ball.
Jahrome Hughes’ try against the Roosters in NRL Round 20 is one such example.

Luke Keary is so worried about Asofa-Solomona here that he gives Hughes free passage to the try line.
It’s poor defence from Easts as much as it is smart attack from the Storm. Asofa-Solomona had two try involvements in NRL Round 20 – this one without taking possesion and a second when his quick play-the-ball led to a Harry Grant try.
I’m still not sure how best to defend Big NAS out wide, and I’m not so sure rival NRL clubs do, either.
Cowboys Defence
The North Queensland Cowboys have conceded just 16 rugby league points in their last three games.
Souths put six on them in NRL Round 17 before the Tigers were kept to nil the week after. To keep the Sea Eagles to just two tries on Saturday – both of them out wide and therefore unconverted – is the latest evidence that Todd Payten has put the Cowboys ‘23 campaign back on track.
Some of their defensive efforts in NRL Round 20 were superb. Their middle muscled up and the edges slid or jammed smartly and in unison.
And when a player did break from the systems, they made sure to make the damned play:

North Queensland are now just outside the Top Eight on points differential alone. They’ve got a tough run home but will play finals football if their defensive form holds.